Civil War Battles |
Colonial Wars |
American Wars |
Link To This Page — Contact Us —
The Battle of Bayou Fourche/Little Rock
September 10, 1863 in Little Rock, Arkansas
Union Forces Commanded by:
Brig. General John W. Davidson
Brig. General John W. Davidson
| Forces | Killed | Wounded | Captured |
| 7,000 est. | 72 k&w | - | - |
Confederate Forces Commanded by:
Brig. General John S. Marmaduke
| Forces | Killed | Wounded | Captured |
| - | - | - | - |
**Missing and Captured
Conclusion: Union Victory

BATTLE SUMMARY
Confederate leaders in Arkansas had long feared that the fall of Vicksburg, Mississippi, would have dire consequences for Little Rock. Maj. Gen. Ulysses S. Grant's capture of Vicksburg on July 4 freed thousands of Union troops for other campaigns, including the re-establishment of Union control in Arkansas.Before the end of July, Maj. Gen. Frederick Steele had arrived at Helena to take command of all Union forces in Arkansas. Grant later expressed doubts about Steele's ability to handle an entire department but considered him to be "a first-class commander of troops in battle." Steele's superiors recognized that control of the Arkansas River was necessary to secure Missouri and northern Arkansas against future Confederate incursions and as a base for operations against the rest of Arkansas.
In Little Rock, Maj. Gen. Theophilus Holmes had become ill following the defeat at the Battle of Helena, and responsibility for the defense of the city had passed to Maj. Gen. Sterling Price. At the time, there were only 8,000 effectives. In addition, there was a growing conviction that Lt. Gen. E. Kirby Smith, commander of the Trans-Mississippi Department, had written off Arkansas, choosing to establish a new defensive line along the Red River.
Price set about devising a plan for the capital's defense. He ordered Brig. Gen. John Marmaduke's and Brig. Gen. ?? Walker's cavalry to observe and harass Union movements and began the construction of a defensive position composed of rifle pits and redoubts on the north side of the Arkansas River about 2 1/2 miles downstream from the city. This position faced eastward and was bounded by a cypress swamp on the left and the river on the right. Price believed that his only chance of successfully defending Little Rock lay in the possibility that the Union commander would launch a straight frontal assault against this fortified position. But the fact that the Arkansas River was fordable in several places downstream from Little Rock made the possibility of such an attack remote. .
On August 10-11, Maj. Gen. Frederick Steele sent his 6,000 infantry, backed by 16 pieces of artillery, west from Helena toward Clarendon on the White River. There, he would rendezvous with a like number of cavalry moving south from Missouri under Brig. Gen. John Davidson. Davidson reached Clarendon on August 8. By the time Steele arrived on August 17, Davidson had already encountered an enemy more troubling than the Confederates: disease. More than 1,000 of his troops were sick. After taking command of the combined force, he made plans to move his base of operations upriver to the higher and allegedly healthier ground at De Valls Bluff, and he sent Davidson across the river to find the Confederate force. As rumors of the Union advance spread, many Arkansans in and around Little Rock fled south.
On August 23, Price ordered Marmaduke to join forces with Walker, Marmaduke's superior, at Brownsville, along the major overland approach to Little Rock. Considering the bitterness that had arisen between these two the previous month at Helena, this was a volatile combination, but Price had other things to worry about.
On August 25, advance elements of Davidson's cavalry collided with Marmaduke's 1,300 cavalrymen near Brownsville. Outnumbered 4-to-1 in men and 8-to-1 in artillery, Marmaduke could not hope to defeat the Federals, but he gave ground grudgingly before retiring from the field. He formed a new battle line 6 miles west of the town, and there he temporarily halted the Union advance.
On August 26, Price ordered Walker and Marmaduke to withdraw to Bayou Meto, a sluggish stream running east of the capital, and to "hold it as long as possible." Their combined forces took up positions at Reed's Bridge on Bayou Meto, approximately 12 miles northeast of Little Rock.
They did not have to wait on the Federals for long.
On August 27, around noon Davidson's cavalry drove the Confederate pickets across Bayou Meto and attempted to seize the bridge. But the Confederates had prepared to burn the bridge, and, as the Union cavalry advanced, the Confederates set it afire. Suddenly, artillery and small arms fire opened up on the Federals with deadly effect and caused a precipitate retreat. The Federals formed their line, brought up their artillery, and the fight continued until sunset, when they retired after failing to take the river. The repulse at Reed's Bridge delayed their advance, but it did not stop them.
That night, the Confederate forces were ordered to withdraw to within 5 miles of Little Rock.
On September 2, Steele arrived at Brownsville with his infantry to join Davidson's force. Reinforcements had brought his total strength to nearly 14,500 men. He spent the next 3 days gathering information, then resumed his advance on September 6, moving south along Bayou Meto and crossing it at Shallow Ford.
The simmering feud between Marmaduke and Walker that had begun at Helena had been rekindled during the retreat from Brownsville to Little Rock. When rumors reached Walker that Marmaduke had accused him of cowardice in the recent actions before Little Rock, Walker demanded an explanation. Not receiving one that he considered satisfactory, he challenged Marmaduke to a duel. Incredibly, with a Union army of more than 14,000 men bearing down on Little Rock
On September 6, the two generals met early in the morning at the Godfrey Le Fevre plantation seven miles below the city to settle their differences with pistols at ten paces. Both men's initial volley missed, but Marmaduke's second shot struck Walker in the side, mortally wounding him. He died the next morning. Price had learned of the impending duel at midnight on September 5, but his order restricting both men to camp never reached Walker and was ignored by Marmaduke. Walker's untimely death only compounded the Confederates' dilemma.
On September 7, Steele reached the Arkansas River near Ashley's Mills. Here, Davidson's cavalry, in advance of the main force, skirmished sharply with Confederate cavalry under Col. R. C. Newton.
On September 8-9, Steele used the 2 days to scout the Confederate positions, to bring up his supplies, and to finalize his plans for the attack.
Price had issued an appeal to the citizens of Little Rock that urged every able-bodied man to arms. In case the appeal did not work, he added that anyone not participating would be arrested.
Meanwhile, Price's troops were fortifying the heights opposite Little Rock. They mounted 3 field guns on Big Rock and others along the crest. Then they established gun emplacements and rifle pits, with the aim to sweep the entire north shore of the Arkansas River so that the Union troops could be driven off or destroyed.
Steele, meanwhile, was preparing to send Davidson's cavalry across the river at a place called Terry's Ferry. Here, the river made a horseshoe bend to the north, enabling Steele to cover the crossing with artillery placed near the neck of the bend. Construction of a pontoon bridge was begun on September 9 and finished on the morning of September 10. A Confederate battery of 4 guns attempted to contest the crossing but was driven off by the counterfires of 20 Union cannon.
By 11:00 A.M., Davidson had all 3 brigades across the river and was moving toward Little Rock along the south bank. Steele led his infantry toward the city along the north bank. He had hoped that Davidson's flanking movement would force Price to weaken or abandon his fortified position on the north shore, and he was not disappointed. Price realized his defensive line had been by-passed, and began to withdraw his men from their entrenchments and to cross them back into Little Rock on pontoon bridges. He then began to evacuate the city; his troops falling back toward Arkadelphia.
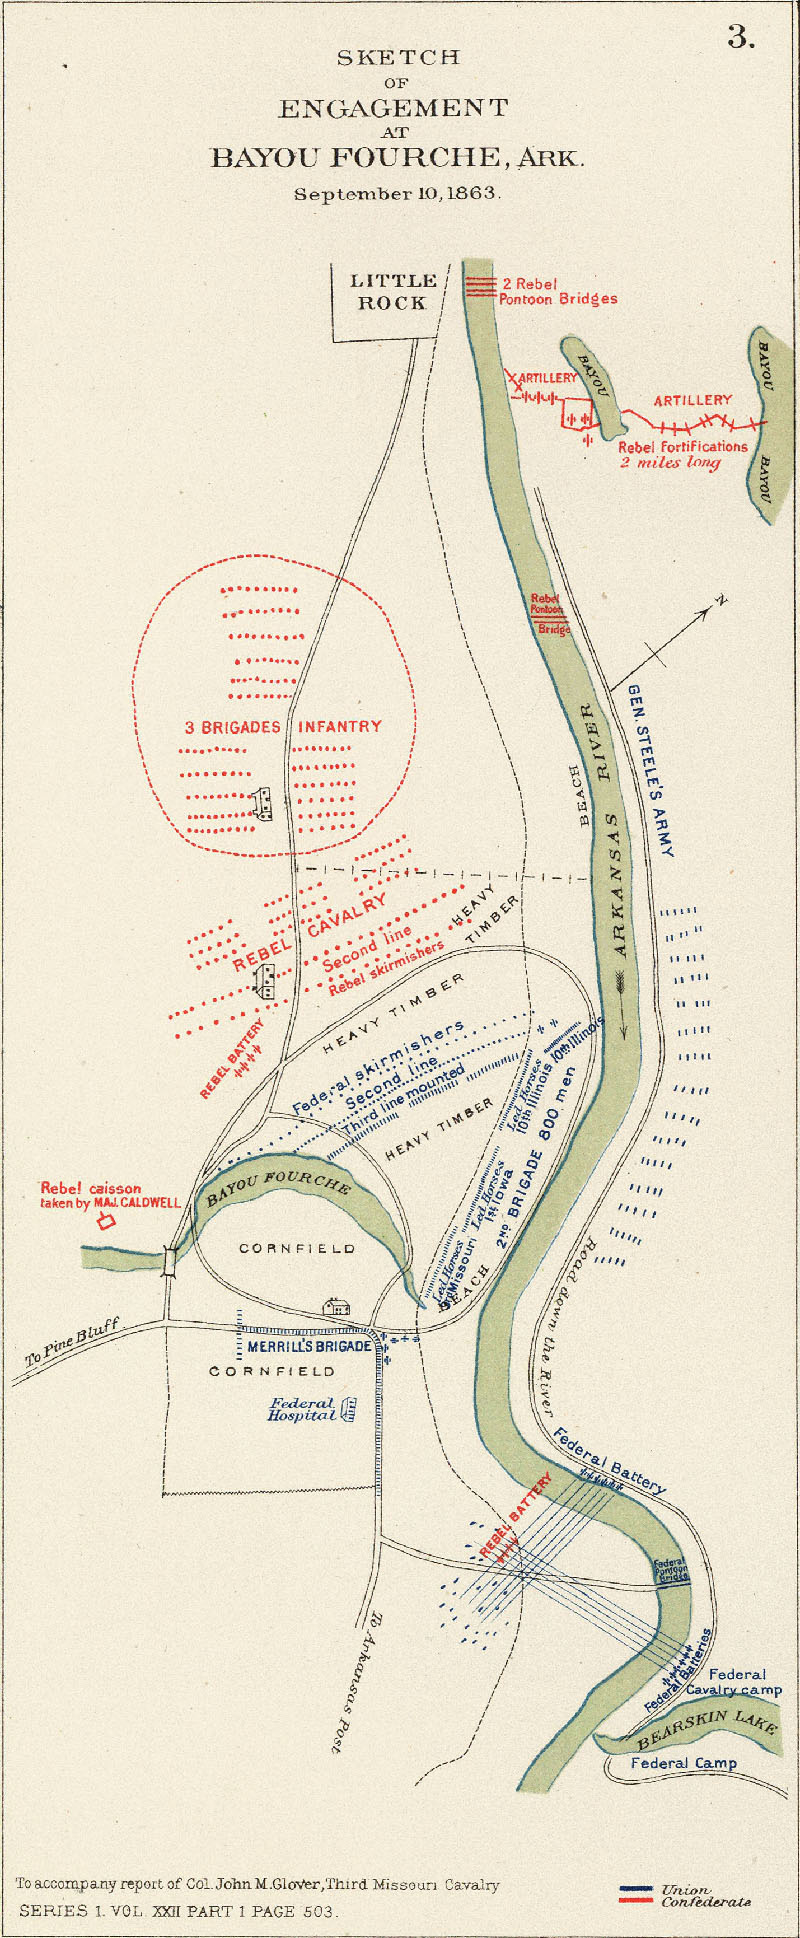
South of the river, Marmaduke's men fell back toward the capital, skirmishing with the advancing Federals as they went. Along Fourche Bayou, about 5 miles from Little Rock, they made a stand. A Union cavalry unit moving through a cornfield east of the bayou ran into "a heavy crossfire of grape, canister, and spherical case." The Confederate resistance brought Davidson's advance to a standstill, but enfilading fire from Steele's artillery across the river came to the rescue. The gunners twice broke up the Confederates' line, producing mass disorder.
The Battle of Fourche Bayou cost the Federals 7 killed and 64 wounded and gave Price time to evacuate the capital. The last Confederate defenders rode out of town about 5;00 P.M. with the Union cavalry entering hard on their heels. At 7:00 P.M., Little Rock's civil authorities formally surrendered the city.
The Union campaign against Little Rock lasted 40 days and cost 137 casualties (18 killed, 118 wounded, 1 missing). Incomplete Confederate reports listed 64 casualties. Price had managed to evacuate his army and a large portion of his supplies to Arkadelphia, but the Little Rock arsenal, with 3,000 pounds of powder and a considerable quantity of cartridges, fell into Union hands.
As the demoralized Confederates retreated after yet another setback, many simply faded away.
Steele made only a half-hearted pursuit of the retreating Confederates, choosing instead to consolidate his control of the city and to secure his line of supply to his base at DeValls Bluff. He seemed to feel that the capture of Little Rock had effectively brought an end to organized Confederate resistance in Arkansas.
On September 19, he wrote to his superior, Maj. Gen. Stephen Hurlbut, "From all accounts, Price's army is demoralized, and half disbanded.... I am told they have made preliminary arrangements to move into Texas.... I am satisfied that the majority of the people of the State are tired of the rebel oppression, and earnestly desire the re-establishment of the old Government."
Map of the battle: